Tuesday, January 20, 2015

How to Customize an Oversized Tank Top


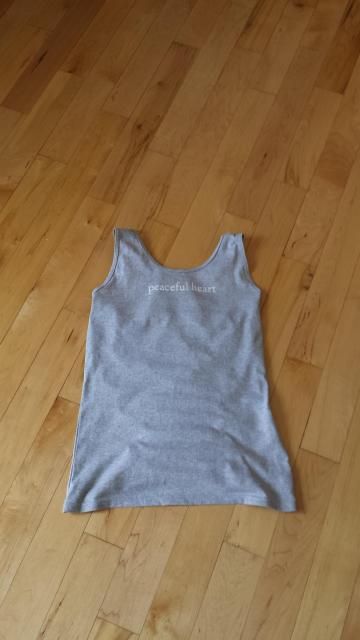
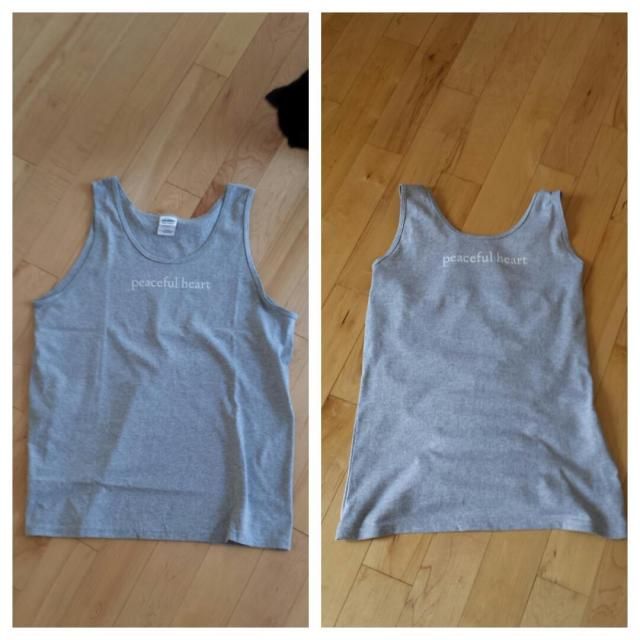
A little while back, Jeca Yoga in Manchester NH sold “Peaceful Heart” tank tops online, where half of the proceeds went to the Manchester Homeless Services Center. The center is a place that I hold near and dear, so it just made sense to order one as well. A few weeks later, the tank top came in the mail and – well – sometimes life needs to come equipped with its own “Price Is Right” whomp whomp sound effect.


The tank top was far too big for me. I was downright swimming in the midsection and the straps were falling off my shoulders. As someone who prefers all of her yoga clothing fitted, this just wasn’t going to work.


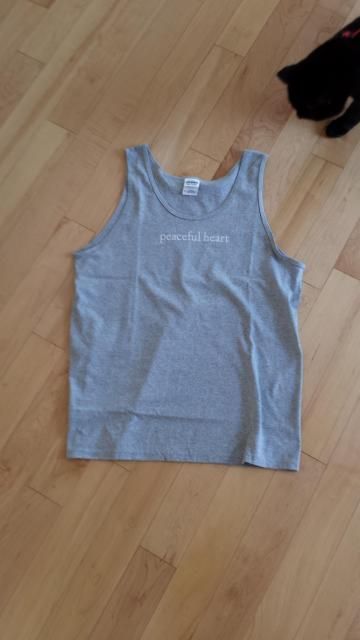
At first, I admitted defeat. I told myself that it didn’t matter, that the emphasis was on a good cause, not a new piece of clothing, that maybe it would work as a baggy pajama shirt…


(Spoiler alert: I didn’t admit defeat for long.)


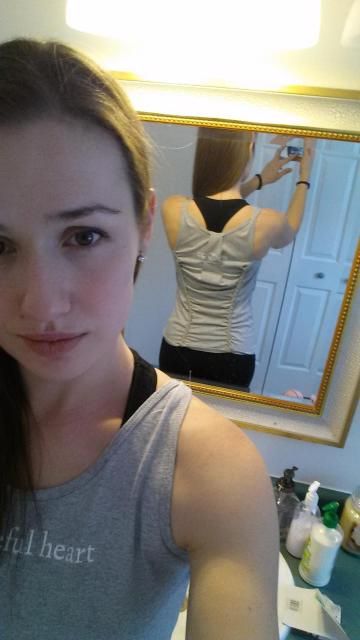
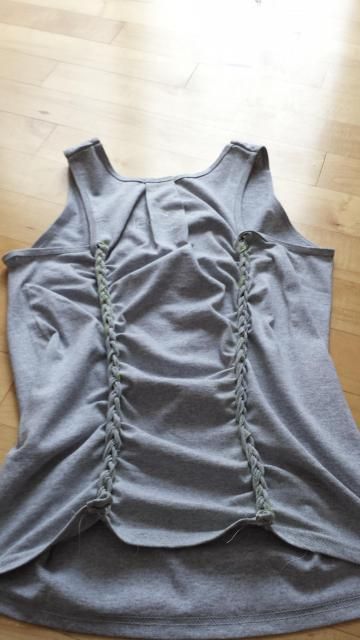
So I decided to set off and figure out how in the world I was going to tailor this tank top to actually fit me. I ended up going at it on three different levels: I pleated, I cut up & braided, and I created side seams. And I ended up with a unique piece that I absolutely love to wear.


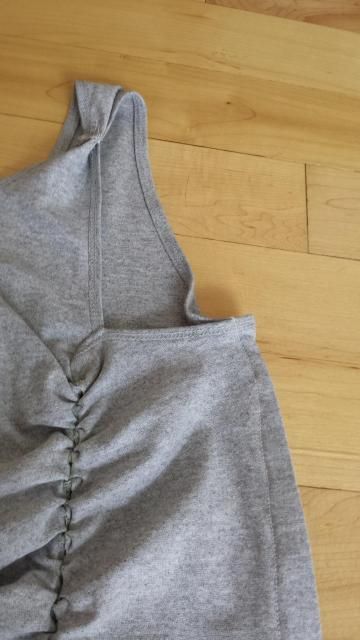
Pleating to Make a Smaller Neckline and Straps

The neckline and straps were too wide for me to wear. To shorten the widths, I pleated the tank top at the back center of the neckline and on the top seam of the straps.


Starting at the back of the neckline, I folded two sides of the collar in towards the middle. I adjusted and readjusted the fabric until the folds were equidistant from the center and pinned everything into place. I then sewed two lines of stitches across the top and ironed the folds into place.


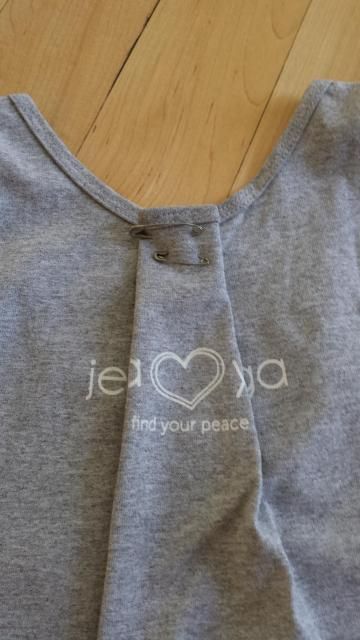
I also accordion-folded the outside edge of each strap over its respective bottom edge, giving the straps a narrow, more pinched look.


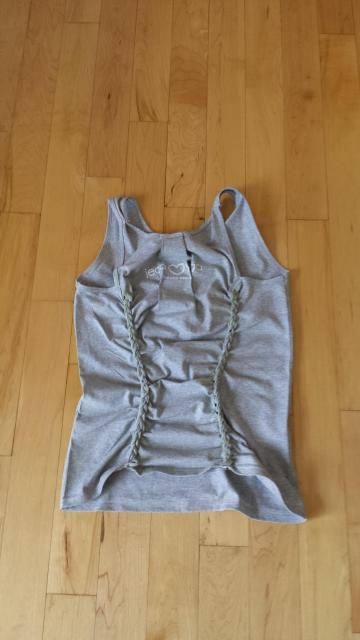
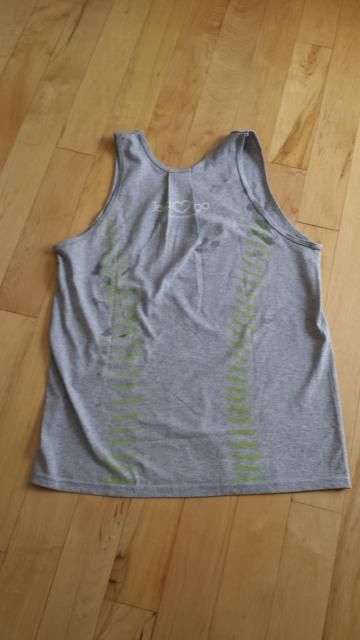
T-Shirt Cutting/Braiding to Cinch the Waistline

Adam Saaks has made a name for himself, cutting up shirts and weaving the strips together. Surprisingly, this process is a lot simpler than it looks.


To get an idea of how the braiding would cinch the shirt, I pinned the areas that I would eventually cut along. This will only give you a rough estimate, but it helps you plan out where and how much you want to cut. Although be aware that the braiding can only do so much, and the shirt will start to also cinch upwards as it cinches in, so find the right balance before cutting anything up.


Since I don’t have fabric chalk, I used standard chalkboard chalk soaked in water to make my lines. I marked the lines halfway in, starting at the pins and ending at the fold. I then removed the pins and created the lines’ other halves. Ideally, every line is of equal length and equal distance from each other. I also recommend running the iron over the shirt both before and after you cut. I heard somewhere that it makes the strips of fabric more manageable and I’ve yet to call that bit of advice on its bluff.


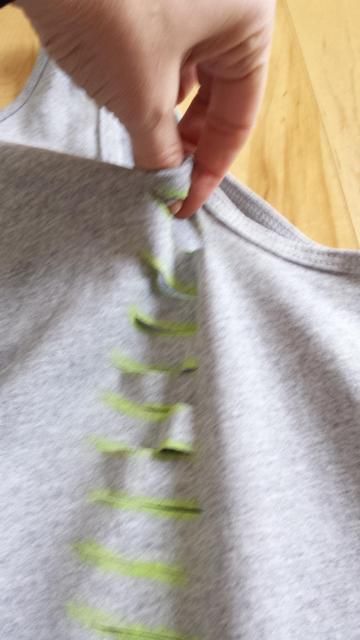
To create the braid: with the t-shirt held taut (I did this on the floor with my feet gently tugging at each side of the shirt. Those with less severe spider-monkey tendencies might want to consider having a friend hold the shirt down), pinch the top strip and turn it once counter-clockwise. Feed the next strip upwards and through the loop you’ve just created. Holding on to the second strip, make sure everything has fed through the loop equally before repeating the process: twist the new piece of fabric once counter-clockwise, feed the next strip up, and make sure everything fed through fine.


Repeat this until you get to the end. Depending on your aesthetic preferences, you can either knot everything into place at the bottom or tuck the last loop behind the last strip and sew it into place. If what I just said made absolutely no sense, this website gives a wonderful pictorial tutorial (even though the words are in German).


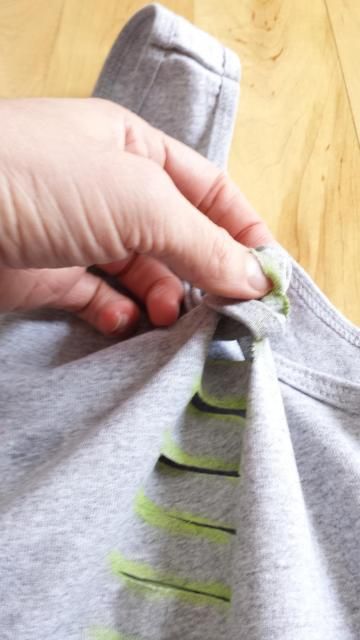
Side Seams To Bring It All Together

The shirt was 90% there, but the torso was still a little off and the armholes were still a little too big. It was time to kill two birds with one stone and create side seams.


Depending on the style, some shirts already come with side seams. That makes things about 100 times easier, as you can usually just sew along the inside edge of the seam that is already in place. This shirt was a single, sans-side-seams unit, so I had to improvise.


There might be better, easier, more efficient ways of creating a seam, but this way worked for me. I first started by turning the tank top inside out, laying the tank top flat against the ironing board, and ironing everything flat so that I’d have at least a general idea of where the sides were. With it still inside out, I put on the shirt and used baby pins to figure out where I’d want the seams to be. After turning the shirt right-side-out and trying it on to make sure everything fit okay, I turned the shirt inside-out again and carefully sewed in a stitch on each side. With only the baby pins to guide me, I essentially eyeballed where I should sew, but you can also use that (wet chalkboard) chalk to draw the lines in, giving you a clearer path.


I then turned the shirt right-side-out (again) and ironed the edges of the seams, which gives everything a clean, more crisp look.


I ended up tweaking the shirt a little more (like adding a few stitches along the fold of the pleat to keep the back from ballooning out) and I am thrilled with the end result. Not only does the tank top finally fit me, but I got to try out that cutting/braiding technique (which was an absolute first for me). Now I know nothing will stop me from buying new clothes in the name of a worthy cause. If they don’t fit, I can just unleash my sewing machine again.

Monday, September 29, 2014

First Autumn as Homeowners Project

A long time ago, I got married. That fall, my husband and I collected leaves and I made a little something to commemorate our first autumn as husband and wife (even though it was technically our fifth autumn together).

Last year, we got our very first house.  That autumn, we didn't collect leaves so much as we raked leaves. But that didn't stop me from snagging a few leaves and repeating the process.

This project is super simple; all you need is a frame,  some high-quality paper, Mod Podge, and a paintbrush. And patience, because the leaves love moving on you. Click here for the original posting and a more detailed how-to on this project.

Thursday, September 4, 2014

Grilled Peaches

aka "Fun With Peaches, Pt 2"!

This are so delicious and so easy, it's not even funny.


You will need:
Peaches, halved and de-pitted
Canola oil

For optional topping:
1/2 stick of softened butter
1 teaspoon cinnamon
2 tablespoons brown sugar
pinch of salt


First, half and de-pit your peaches. Getting the pit out takes a lot of practice. I've found that the easiest way is to slice them in half, using the natural fold in peaches as my guide, twist the two pieces apart, and using your knife to gently pop out the pit. Sometimes cutting around the pit helps. And sometimes you'll get a nice clean de-pitting. Sometimes you won't.


Brush a healthy amount of canola oil on the flat side of the peach half and lay them on the grill. Close the lid and let them cook for 10-15 minutes.


If you'd like a super delicious (but totally unhealthy) topping, mix the butter, sugar, cinnamon, and salt. Scoop a spoonful on the grilled peaches while they're still hot and enjoy!


The bowl of peaches is slowly going down. Up next: peach jelly!

Wednesday, August 27, 2014

The Super Simple Peach Cobbler


So I have an absolutely adorable peach tree in our yard. Like everything gardening-related, it was planted by the previous owners. And -- judging from how little it is -- I'd say it was planted just before they left. This was the first year it produced fruit. For a little quasi-sapling, it really delivered:


So now I'm swimming in peaches. Only one thing to do: try out a million different peach recipes. First on the list? Peach cobbler!


You will need:
~6 cups of peaches, cut into wedges
3/4 cup of sugar or sugar substitute
1 tablespoon lemon juice
4 teaspoons cornstarch
1/2 teaspoon salt
For the topping: 6 tablespoons softened butter (better to leave the butter out to soften -- beware using the microwave to soften it!)
1/4 cup brown sugar
1 cup all-purpose flour
1/2 teaspoon salt


Preheat the oven to 365. In a big bowl, combine the peaches, sugar, lemon juice, cornstarch, and salt. Gently mix together until the peach wedges have an even coating. Transfer the mixture to a porcelain baking dish -- an 8" square dish or a round dish with a 8" diameter is best.


In another bowl, combine butter and brown sugar. Mix the two until the butter and brown sugar are fully combined and has the consistency of thick pancake batter. Gently mix in flour and salt. The mixture should start to crumble; if it doesn't break apart piece with your hands.


Sprinkle topping over the peaches and bake at 375 for 30 minutes. Place a loose cover on top of the dish and return it to the oven for an additional 20. Let it cool for 30-60 minutes and serve with a gigantic scoop of ice cream.


As fun as that project was, I still have a ton of peaches left. Good thing the internet is full of recipes for me to try and adapt from!

Thursday, August 7, 2014

A Crazy Little Update


I've been meaning to post an update on this particular blog for a while now. And "for a while", I mean for the last week. It's been a nutty time as of late, hence the supreme lack of posts. I just haven't had the time or the energy to be making any real crafts of late -- and those that I do, I haven't really been able to go that extra step forward and write tutorials for them. But that doesn't mean I've been sitting around, marathoning Hotwives of Orlando and doing nothing else (although, seriously, you should check out that show. It's hilarious):


1. For one, the 365 Blog Project is complete. Remember when I decided to attempt a post a day for an entire year? Three hundred, sixty-five posts later, it's complete. I cannot believe I actually got to see this project through to the end, but I'm happy I did. I really have to credit that project with helping me become a better essayist.


2. Speaking of, have you been keeping up on my essays? Primarily through Thought Catalog, but I've been known to get another website or two to pay attention. My latest essay is on the Market Basket situation, which has actually garnered enough attention that I was the 94.9 WHOM in New England yesterday to discuss Market Basket and my writing/modeling career in general.


3. I'm not finished blogging about non-crafting, non-cooking things. I've started a proper, all-encompassing blog by the same name as my Twitter. I usually frown upon blog hopping, because it's usually a sign that you like the idea of writing more than you like actually sitting down and making yourself write, but I wanted to keep my 365 blog nice and uniform. I'm currently doing a two-week fiction bootcamp (aka the 365 Nicorette Patch).


4. My life has been one big yogafest. I finish my formal training in about two weeks, and life has been insane since. I started teaching yoga to the homeless at a homeless services center, which has been incredible. It's definitely no walk in the park, but the reception has been a thousand times warmer than I thought it would ever be. I've also started subbing as a yoga instructor. I still have some more observation and practicum hours to get in before I'm fully "graduated", and I've been zipping all around New Hampshire as a result.


5. I promise I'll get back into the swing of things with this blog. There's a few projects that I just need to kick myself in the butt and write about. And -- as you could probably already tell -- I've been focusing on learning to actually cook. Hopefully now that training is winding down (and I won't be writing in a blog every single day soon), I can actually focus on this blog again!

Friday, July 25, 2014

Super Easy Garlic Parmesan Potatoes


This has been an instant classic at my house, and now I'm finally sharing it with you guys.


You will need:
2-4 Russet Potatoes (the exact number with depend on casserole size and your own preference
3 Tablespoons Olive Oil
1 Tablespoon Garlic Salt
2 Tablespoons Paprika
4 Tablespoons Parmesan
Salt & Pepper
Optional: Garlic Cloves


1. Preheat the oven to 425 and give your glass casserole dish a healthy spray of Pam or Crisco. Dice up the potatoes place them in said casserole dish.

2. Mix in the olive oil until the potatoes have a good coating about them. Mix in the remaining spices, adding or subtracting how much you want of each spice depending on your own taste preferences. If you'd like, you can also mince garlic or add whole garlic cloves to this meal.

3. Cook for 20 minute intervals. After each interval, take the dish out and flip the potatoes around. Continue this for an hour or until the potatoes are gold and crispy.

4. Take them out and sprinkle with additional Parmesan. For an added bonus, sprinkle in crumbled bacon.


The measurements of the spices really will depend on your temperament. I love spice, so I double up on the garlic salt and paprika. I also get down and dirty while making this dish, using my (recently and thoroughly washed) hands to mix in the spices and olive oil.


And remember to take the dish fully out of the oven before you mix the potatoes. I have a lovely burn scar on my left forearm that can tell you that it's a bad idea to mix while still in the oven, even if you have oven mitts on.

Wednesday, July 16, 2014

Writer's Wednesday: When The Idea of Your Novel Sickens You


I mentioned a long while back about the Travis Parker Effect. That's something I made up to bring to light a very common phenomenon with writers and artists alike: we work like a dog, pumping out our little creation to the exclusion of downright everything else, we finish the project, and there's a moment when we've decided it's the worst piece of shit imaginable and we should be ashamed for putting that much effort into it.


I call it the Travis Parker Effect because of 6 Days to Air: The Making of South Park. On Day 6, with the show conceptualized, written, recorded, and animated, Travis Parker slumps at his desk, muttering that the show is the worst show he has ever created. No one really seems to pay him any mind; you quickly get the vibe that this a common situation after a show has been created. The Travis Parker Effect is nothing more than the fallout artists sometimes get after they've dove headfirst into their project and have finally come up for air.


About a month ago, I finished Manuscript #3. It was a bit grueling at times, but somehow I plodded ahead and got the damn thing done. I finished it knowing that there were scenes I would have to add, scenes I would have to rewrite, characters that would have to be consolidated and characters that would need more fleshing out. That's the joy of a first draft: you got your main idea down, but now the real work begins.


I decided to follow the 3 month rule: you are not allowed to even look at your manuscript for three months. This helps you look at the manuscript with a fresh set of eyes, reading what is actually in front of you and not what you were trying to convey. But there's another reason: to avoid the Travis Parker Effect.


I'm already starting to feel it: man, I know this character just pops out of no where, and these characters are interchangeable, and this and that and this and that... which is hilarious, because, plot-wise, this is probably the best novel I have ever written. And let's not even get into the number of rewrites my first manuscript went through.


So, what do you do when the idea of your novel sickens you? When the very idea of editing makes you cringe because you're still feeling the emotional fallout of finishing your novel? You leave it the hell alone.


In fact, you leave all your manuscripts alone. I attempted to work on M#2 (which is still in it's first round of edits), only to find myself getting discouraged by the same attitude: this is the worst thing I've ever written, the number of edits and rewrites I will have to do is disgustingly high, what was I thinking, why did I let myself spend so much time on this...


This is why I have nothing but respect for full-time writers. I've been focusing my energy on the other endeavors in my life, like my yoga training (and preparing to teach yoga at a homeless shelter, but more on that later) and my tai chi classes. I've been focusing on writing out my proposal to martial art studios for a Yoga for Martial Artist class. I've been focusing on my 365 blog, which gets zero editing (I'm lucky if I read through the damn thing after it's done.)


The editing process is an onerous enough task on its own. The last thing you need is to attempt it while still processing the emotional fallout from what you created. So this little confession is my way of letting fellow writers know that it's okay to metaphorically slump at your desk and proclaim that you just made the worst thing ever -- just so long as the rest of you plays the part of the production team, paying no mind to the emotional fallout.


x-posted to my 365 Blog, which is less than 20 days away from completion!

Wednesday, July 9, 2014

Designing the Guest Bathroom


Everyone loves a little potty talk, no?


Since we don't have kids, the bathroom on the second floor of our house is essentially the guest bathroom. Aside from the hypothetical guest, it really only gets used if someone is hogging the master bathroom (and by "someone", I mean "my husband"). This means that, until this bathroom becomes littered with tubby-time toys and other kid items, I can indulge in a little home decor.


I remember going on Pinterest and obsessing over a DIY project that would give your bathroom mirror an accenting frame. Looks like I lucked out; all of the mirrors in our bathrooms are already framed. However, if you're thinking of doing the same this was one of the projects that I had pinned. It really turns a standard bathroom mirror into something more noticeable.


Is it slightly tongue-in-cheek to put pictures of riversides and fountains in a bathroom, but oh well. Why not have hung pictures in your bathroom?


And a long collage-like frame works great by door frames.


I got these adorable embroidered towels from my brother- and sister-in-law. The light tan goes so well with the white and pale lavender -- and it's a nice little reminder to the guest whose house they are in ;)


The light, airy feel of the room, it just made sense to buy a glass set for the sink.


And what is a guest bathroom without guest toiletries? I started this when we lived in our apartment and it now actually has a proper home. I collect the shampoos and soaps the same way other people will collect hotel matchbooks or business cards. Why not keep them in a glass out in the open? I know I feel a little weird using other people's big bottles of shampoo (or soap bars, sheesh). This gives them the option of having their own little bottle or bar.


And, going with the pale lavendar/glass theme, I got these for free thanks to my former neighbor at my apartment complex. Now they have a permanent home as bathroom decor (also, check out the snow in the background -- can you tell I shot these pictures a few months ago?).


I found this at Target and absolutely fell in love. The diamond folds are a really nice touch.


I know that's a lot of work for one little bathroom, but, hey, that's the joys of homeownership -- that bathroom is mine (technically the bank's until like 2033), and I can do whatever I want.


Up next -- my dining room! Now that we finally bought a kitchenette table and put our dining room table in the actual dining room, I've been able to let my pseudo-interior decorator loose on yet another room.

Thursday, July 3, 2014

Red, White, and Blue (and Green) Salad


I hope everyone has a wonderful Fourth of July, whatever the plans may be. If you're having a barbecue, may I suggest getting a little campy and making a red, white, and blue salad?


The ingredients are simple: Romaine lettuce and spinach, topped with cherry tomatoes, feta (or goat) cheese, and blueberries. It's quick, it's easy, and it's delicious.


I'm currently unwinding from my DC/NYC trip (pictures to come soon), but I'm excited for the fireworks, my friend's barbecue, and a weekend with not one, but two UFC events. Some call it an unhealthy obsession. I call it America at its finest =)

Tuesday, June 17, 2014

One of the Healthiest Breakfasts You Can Ever Have


I've noticed that, the older I get, the more I care about what I'm eating. I spend less and less money on prepackaged food and more money on, well, salads. I've recognized that my body isn't the crazy-food-eating machine that it used to be and have been making a more conscious effort about nutrition.


We've all heard the talk about cinnamon being a super-spice. It appears it can do everything from raise the dead to finish your manuscript. But I rarely have anything with cinnamon in it, and, when I do, the "cinnamon" is probably just "naturally flavored" sugar.


So I've started going down the old fashioned route. Did I say "route"? I meant oats. A couple mornings a week, I bust out my electric tea kettle and have some old fashioned oats with raisins, cinnamon, and agave sweetener. Gone are the days of instant packets backed to the brim with refined sugar (that I would sweeten even *further* with cream and brown sugar. Honestly, how was my mouth not a walking cavity machine when I was a kid?).


The key here is that you need all three ingredients with old fashioned oats: raisins and cinnamon and agave sweetener. Miss any of the three and the oats taste exactly like ... well, plain oats. But, together, they make a pretty awesome meal.


And it's as simple as pouring a bit of boiling water into a bowl of dry oats, raisins, and cinnamon, stirring the contents, and then adding in agave. I've also started adding a spoonful of chia seeds for a tiny kick (and extra hippy-dippy healthiness).


Of course, that's not to say I don't ever make stacks of pancakes and dive Scrooge McDuck-style into the syrup, but it's good to have a healthy option or two.
Related Posts Plugin for WordPress, Blogger...

09 10 11 12
Blogging tips