Wednesday, June 27, 2012

Try It Tuesday (On a Wednesday): Wedding Colors as Your First Wedding Anniversary Outfit

So, I got to admit something right out of the gate: I didn't even realize that weddings had color themes until I was knee-deep in wedding planning.

My wedding colors just sorta … happened. My husband and my's birthstones are sapphire and ruby, respectively (I've already gone on about everything that entails). Certain things were a given to me: on the night he proposed, my husband ordered a bouquet of flowers as our centerpiece at the restaurant. The flowers were roses and irises -- essentially our birthstone colors. To me, it made sense that that same centerpiece would be our centerpiece at our wedding.

Like the little genius I was, I thought to myself, "Oh my, I can totally incorporate ruby red and sapphire blue to many aspects of my wedding!"

To which one of my more wedding-savvy friends said: "Which is also known as a color theme. An extremely common aspect of a wedding."

Whoops.

However, just because my wedding colors essentially chose me didn't mean I couldn't be obscenely sentimental about them -- which I think I've already proven, with my chain bracelet and ribbon bangle.

For my one-year anniversary, my husband surprised me with a road trip to Niagara Falls and Toronto. We went here as our very first trip way back in 2007. Ironically, everyone thought I would return from that trip with a ring on my hand. For anyone who thought wedding bells were in the air, they had about 4 more years to wait.

Our actual anniversary day was packed with our favorite touristy activities in the area (Maid of the Mist, Behind the Falls, Boardwalk Rapids, etc), and topped off with a wonderful dinner at Watermark atop the Niagara Hilton. We then enjoyed a wonderful nighttime horse-and-carriage ride by the falls and ended the night eating the top tier of our cake -- which somehow survived a year in our freezer, followed by 10 hours in a car.

For our anniversary dinner and carriage ride, I decided to go crazy sentimental and piece together a sapphire-blue dress with ruby-red slippers (er, flats. There's no place like Canada; there's no place like Canada…). And, actually, like my wedding colors, I didn't come up with the idea until I bought the dress and remarked on how much I loved the dark shade of blue.

The best part about this outfit was that it was a breeze finding flats in dark red. Flats tend to come in every possible color (more so than sandals or heels). And, this time of year, it is insanely easy to find a sundress in almost any possible color. This is made easier if one of your wedding colors is white (which is very common -- both in terms of wedding colors and in flats/dresses!).

Friday, June 22, 2012

Photo Friday: Going Back Home

Last Sunday, my husband and I hung out with my brother-in-law and his fiancée one last time before my brother-in-law moved off to Las Vegas. However, my husband had ice hockey just before we were planning to hang out. This particular hockey league was located not even a few blocks from where we used to live (interestingly enough, my husband didn't sign up for this league until long after we moved to New Hampshire). I decided to grab my camera and, while my husband played hockey, I walked around my old neighborhood.

As much as I love Nashua, with its scenic hills and beautiful rivers, I really felt homesick walking around. My favorite area was the section of shops that seemed to have frozen in time since the 1950s (and, like any girl worth her weight in Mad Men DVDs, I have an obsession with the 50s and 60s). With the entire Boston area become more and more modern, these are becoming more and more rare, making these shops more and more precious.


Slowly but surely, all of my friends and family are slowly moving out and away from Boston. From New York to Chicago, Seattle to Las Vegas (and Nashua). It's very interesting to watch. If anything, it's just an excuse for me to visit every corner of America.

Wednesday, June 20, 2012

Writer's Wednesday: Creating Cover Art

Is there anything more daunting for a writer than trying to fill up a blank page with thought-provoking, insightful words?

Yes: creating cover art.

I have a precious month of vacation before I am summoned to summer camp duty, and I want to utilize this time. I've set a goal of September 1st as my release date and I am going to haul ass to make sure I make it.

The morning of my first day of freedom, I set up a makeshift photo studio. I had to settle for desk lamps instead of soft boxes…

…and a curious cat instead of an assistant, but I felt my way long, stacking boxes where I needed to stack boxes (again, instead of light stands, I had boxes) and grabbing additional lights when necessary.

The nice thing is that, for about a month prior, I sketched out at least 10 - 15 design ideas for the cover, and decided on a fairly minimalistic (read: cheap and simple to do) stack of books with a teacup. I also spent the last week of (real) work figuring out the logistics. Where would I shoot this? How would I shoot this? I decided on the table in my living room/workout area, with the spine of the books facing away (lest I get sued for copyright infringement).

Doing this gave me a whole new perspective on professional photographers. I tend to be very whimsical about how I take pictures: if I take a great shot, awesome. If I miss the mark, delete. But with this, I had no choice but to eventually hit the mark. This meant taking lots and lots and lots of photos where the changes were extremely minute. This used to drive me nuts on modeling gigs; why do they need me to rotate my head 5 whole degrees? What difference will that make?

Well, a lot.

After I felt comfortable in what I shot, I disassembled my makeshift studio and went to work making the prototypes.

Like the photos, I made way more prototypes than I was comfortable with, each slightly different than the other. Different shots, different color balances, different effects.

And this is just page one.

When I *finally* settled on one photo, I created a .PSD (Photoshop Document) to serve as my base for the rest of my prototypes. This made my life a million times easier: with the layers still un-merged, I could dabble with the effects without mucking up the titles. Likewise, if I wanted to change something with the title, I could delete it without mucking up the effects on the picture.

I found myself at a loss. I liked the overall feel of the prototypes, but it all felt too…indie, for my tastes. Granted, there is nothing more independent than an unestablished writer using her own DSLR to take pictures of her own books using her own lighting, but I didn't want the potential reader to see the cover and automatically assume, "Oh. Self-published. Pass." Some prototypes looked good, but seemed to fall flat when I imagined them as an e-book (good practice for those creating their own cover-art: open the prototype and either expand it so that it fills the entire screen, or cover your hands over the rest of the screen. Does it look good as a stand-alone on a big screen? Would you want to read a book if that's what you saw when you clicked on the thumbnail?)

Speaking of thumbnails: I was happy that each prototype -- at the very least -- looked good in thumbnail form. The minimal design with big bold "CHICK LIT" (which gives you a good hint as to what part of the title is) at least catches the eye's attention. So at least there was that.

The best part of this whole operation is that, after I swore I had my chosen photo, I found another one I liked a smidgen better, one that hadn't been made into a single prototype from.

And not even hours after realizing that, my husband came up with the suggest: why don't I try drawing the stack of books and tea cup? Maybe a sketched look is what the cover needs.

I fully recognize that this is going to be a very long process. When I first came up with the idea for my cover art, I naively thought that I'd have a finished product before I even finished my last edit. But there's a reason why, even with a team of people working on a person's book, a manuscript isn't ready to be printed and distributed as a book for upwards of a year. I gave myself the ambitious September 1st deadline. Two and a half months seems like such a long time, especially when I'll have one of those months work-free, but, at the end of the day, this is my book, my baby. The first novel I've written that I am genuinely, genuinely proud of (as opposed to my previous attempts, which hide in shame in a binder somewhere at my parents' house).

Even I sell only 10 copies, I want everything to be right. And that includes working feverishly at cover art prototypes until I go cross-eyed, only to realize that I might have to start again from scratch.

Tuesday, June 19, 2012

Try It Tuesday: Spa in a Box (and Chair)

There are few (educated) people in this world who would disagree with this statement: teaching is a stressful, exhausting, and sometimes completely thankless profession. The burnout rate is through the roof, especially for early childhood educators like myself. So it's important to find ways to unwind.

I found that a simple mani-pedi can make all the difference. But, as a teacher, I don't exactly make enough to justify going to the salon every single evening after work. So I brought the spa home to me.

I gathered up whatever items I could find that would create a great relaxing experience: nail polish, pumice stone, nail files, cuticle clipper, a great body mist spray, lotion that (if the label on the bottle is any indication) reduces stress, bath salts for the foot/hand soak, a facial mask, and -- of course -- nail polish remover.

Everything fit nicely in one of my old shoe boxes (lined with pink tissue paper that I had amassed over the years thanks to Victoria's Secret).

I combined the box with a massage chair attachment that I got during some Black Friday sale years ago at a Walgreen's (you can always find these treasures right by the pharmacy, next to the incontinence products and walkers. If that doesn't spell "enticement"…) as well as a few old, narrow Gladware containers for the foot/hand soak. I parked everything in a nice little spot in my bedroom, good to go to whenever I needed a moment to unwind.

The Spa in a Box experience would go as so: I put on a facial mask, fill up the containers with hot water and bath salts, and soak my feet while getting a mechanic back massage and watching whatever trash TV I felt like watching. I'd then lotion up my feet, prep and paint my toe nails, and relax some more as everything dried. If the day was really bad, I'd also do my fingernails (although I rarely do my fingernails, save for a few projects, as I'm a recovering nail biter).

The best part is that this is always out and ready. I don't have to go digging through our bathroom closet to find what I need. I just pull out the chair, plug it in to the nearest electrical outlet, and relax -- which is needed, when your students make you want to pull out a chair, throw it through a window, and dive out to freedom.

Thursday, June 14, 2012

Script Print Candles

This is a super-simple (or, supposedly super-simple) craft I got off of Pinterest.

For this, I got: three candles ("Fresh Linen" scented), of slightly-varying heights, an ink pad (I suggest getting multi-surface/multi-purpose ink pads), and a stamper with script on it.

Now, the idea is stupidly simple on paper: put ink on stamp, roll candle over stamp, get awesome script. Easy, right? Not so easy when the ink doesn't want to go onto the stamp. I spent God knows how long squeezing and scraping the ink pad onto the stamp pad to get even an iota of ink on it. I didn't help that my ink pad was 1/3 of the stamp pad. I found a series of long presses onto the stamp worked, so long as I was absurdly careful never to overlap or accidentally bump the stamp.

Now, I'm only doing this one-handedly so I could take a (blurry) picture of it. In real life, I held the candle at both ends and rolled it over the stamper. The candle would then be placed off to the side to dry and I would spend another 5 minutes dabbing ink onto the stamp. I did this many, many times with each candle, sometimes going over supposedly stamped sections a second or third time.

Even though they don't look like they did on the internets, I actually love the look I achieved. What started as a pain in my backside ended up as a pretty awesome aesthetic. The uneven ink gives it an old-timey feel, like someone had been scribbling away on them with a quill. This type of project can easily (or not so easily) be done with any type of stamp. In fact, I'll probably try a small flower stamp next time -- anything that actually holds the ink.

Tuesday, June 12, 2012

Try it Tuesday: How to Stop Biting Your Nails

As a teenager, I remember reading article upon article focusing on how to stop biting your nails. While they sounded great (buy this bitter-tasting nail polish, chew gum instead, go to the spa -- like -- every day!) they never worked for me.

About 4 years ago, I decided enough was enough: I need to figure out my own path to kicking the habit. Somehow, my plan worked, and, minus a very small number of slip-ups over the past 4 years, I have refrained from biting my nails. Since I was asked by a co-worker how I stopped obsessively nail-biting, I decided to write about how I did it as well. This is how I stopped myself from biting my nails. Everyone is going to be different, but at least these tips are more realistic than the magazine's.

1) Until you're back on the wagon, keep them short.
I think that's the one major flaw in every nail-biting article, ever. They talk about not biting your nails with the specific intent of having nice, long nails. Here's the problem: the longer they are, the more I wanted to bite them off. I could go a week or two without biting my nails, only to cave and gleefully (all too gleefully) go at my long nails.

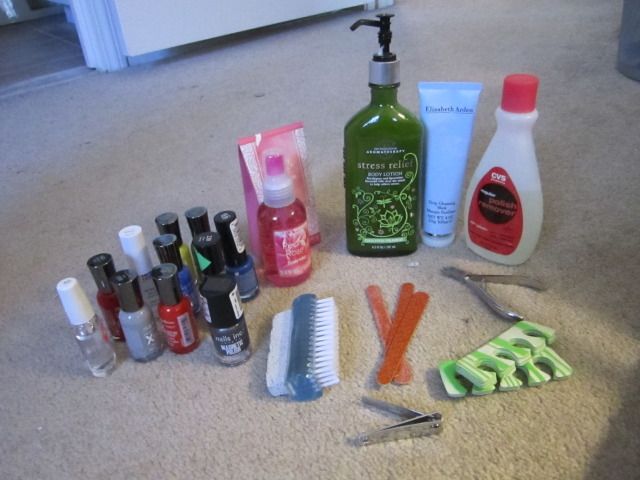
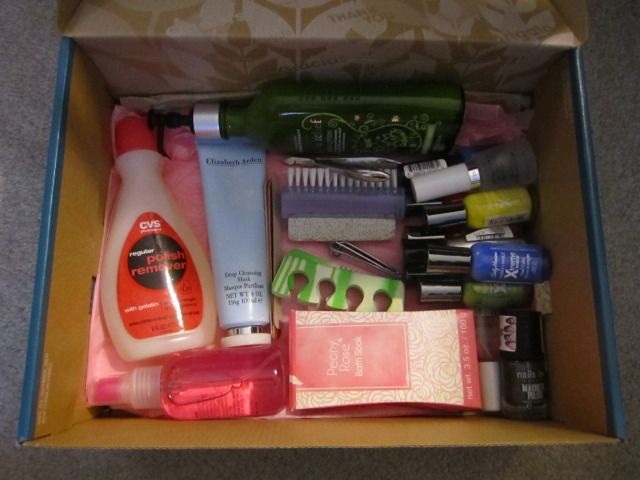
In the beginning, I bought five or six packages of the small Revlon nail files (go simple and get the no-frills, disposal nail files. The wide, fancy kind always disappoint me. You're spending money on the nail file pattern and the glitter, not the nail-filing abilities). I had a nail file in every room of my apartment, in every purse, backpack, clutch, jacket pocket… I kept a few at my desk and left the extras in a jar on my nightstand.

The goal was clear: transfer neurotic nail biting into neurotic nail filing. Sometimes transference is the only way things can get accomplished (just ask any teacher in regards to redirection). So, whenever I was tempted to gnaw away, I whipped out my nearest nail file and went at my nails until there was no nail to bite.

2) Treat nail biting like quitting smoking and go on the Nail-orette Patch.
Even with neurotically nail-filing, I still wanted to chew my nails to the quick. I consolidated this desire to just my thumb nails. This worked even better than the nail filing alone. If I could focus on biting just those two thumb nails, as long as I had a nail file on hand to fix my other nails, I could go without biting my finger nails indefinitely.

When I felt I was ready, I narrowed it down to just my right thumbnail. The only drawback was that I had to neurotically file down my left thumbnail (since I was essentially at square one with that nail). I must admit: I haven't completely rid myself of biting my right thumbnail. It's hard, especially since my right thumbnail has a weird dent in the middle, which is as good as a neon sign yelling, "BITE ME!" I can go upwards of a month without biting it but, given the stressful nature of my job, I find myself biting it like its the route cause of all my anxiety.

3) Don't get your nails done.
Every article always talks about getting your nails done so you wouldn't possibly want to ruin them. Anyone with obsessive-compulsive behaviors (and most people who nail-bite usually have other behaviors that mirror OCD) knows how bullshit that sentiment is. I've had my nails done perfectly before, only to pick at the nail polish at every chance. This lead to cracked, weakened nails, which are prime candidates for nail-biting. The only time I didn't chip away at my nails was when I got them done for my wedding, but even then, I picked at them mercilessly the second I returned from my honeymoon.

I say, at the absolute maximum, put one layer of clear nail polish on your nails. And keep nail polish remover on hand if you find yourself picking at it.

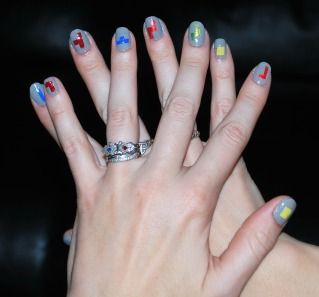
I know it's contradictory to have my main picture be that of my fingernails with an semi-elaborate nail polish pattern on them, but I wanted to kill two birds with one stone and show my Tetris nail design as well as the length of my nails (which ironically, is hidden with the Tetris design).

4) Round out the corners when you file.
I don't know why, but, for me, the sharp corners are the most enticing portions of my fingernails. So, when I felt comfortable having longer nails, I made sure to file nice rounded edges.

Basically, figure out what it is exactly about your nails that tempts you to bite them and find a way to get rid of it.

5) Never ever ever ever ever EVER put your nails in your mouth, for WHATEVER reason.
This is the nail-biting equivalent "You trust me, right? Just lend me $20. I promise I'll only spend it on groceries. Not booze." My nails might be dirty. So my brain tricks me, telling me that I'm just trying to clean my nails. This leads to scraping at my nails, which leads to breaking the nails. And, since the nail is already broken…

The same for chipped nails. I once thought I could just bite out a broken corner. But that's just not how it works. Biting away a chipped corner turns into biting the whole nail. This is also why you should always have a nail file on hand. There is never an excuse to have your teeth touch your nails.

So there you have it. That's how I stopped biting my nails. It might not work for you but, unlike the articles that littered my adolescent years, I understand that everyone is different and it might take a different path for others. But, if you're willing, try my 5 steps and see what happens.

Next week, I'll talk about how I got those Tetris designs on my nails =)

Thursday, June 7, 2012

Flower Necklace

Here's a little necklace I decided to make one Saturday morning. This is also known as, "What happens when Abby is allowed to spend too much time in the jewelry-making section of a crafts store."

For this, I got out: chains, jump rings, pliers, wire cutters, a lobster clasp, and flower pendants.

I must admit: I went through a lot of chain figuring out where I wanted these flowers. The only way to figure out exactly where you want your flowers is to attach them to your chain, try it on, and go from there. This can be incredibly time-consuming, especially if you're a perfectionist, but its worth it. It's all about what you want. After a lot of trial and error, I went with an asymmetrical look.

Attaching the top part of the flower was easy: I simply opened a jump ring with pliers and attached one end of a chain with the pendant loop. The bottom part took a little finagling. Using the same-sized jump ring, I attached the end of another chain piece to one of the petals. I say finagling because the jump ring was just big enough to fit, so there was little wiggle room.

I decided to attach two flowers together, which was easy enough: instead of attaching the bottom portion of the flower to the end of a chain, I attached it to the pendant loop of the second flower.

It's a simple, delicate necklace, and I really like it. I can't wait to wear it with a solid-colored sundress or a scoop-necked, short-sleeved shirt.

Sunday, June 3, 2012

A New Take on the (Stupidly Simple) Circle Shirt

Creating the circle shirt was a lot of fun, and a great first shirt to make, but I'm trying to improve as a pseudo-seamstress. I wanted to up the ante. So I decided to throw caution (read: money spent on fabric) to the wind and create my own version of it.

Like the first shirt, I bought a yard of stretchy nylon fabric, right next to all the swim and dancewear fabrics. This time I bought white, understanding fully that I'd forever need to wear a tank top underneath it because the fabric was pretty sheer.

And, like the first shirt, I folded it in half the long way/vertically, so that I'd have half a yard hanging from my shoulders. I did this because I'm 5'10" and all torso, so I need my shirts very long. For for normally-height-and-proportioned people, you could try folding it horizontally instead. This would probably give you much flowey-er sleeves.

I found another favorite shirt and placed it in the center of the fabric. I first pinned about halfway down (which, in this case, was nearly the full length of the actual shirt. Like I said: I like my shirts long). I went with the same curves as the shirt, keeping at least an inch border between the pins and the edge of the shirt.

After, I used the shirt's neck hole as a starting point for the circle shirt's neck hole. Like the first shirt, I cut through both thicknesses along the back edge.

I then cut a conservative hole in the top layer of fabric. As I learned already, I need to be super careful about how big a hole I cut. I could always cut bigger -- I could never cut smaller.

I then sewed exactly where the pins were, being careful to stop when I ran out of pins.

After I was done with the sewing machine, I cut an incredibly angular section off the shirt. Remember that I wanted this shirt long, so I made ample room for my hips. For a regular-sized shirt, the angle would be a lot less dramatic. Like with the first shirt, I folded the first shirt over and cut along the edge of the first side so both sides would be symmetrical.

I flipped the shirt inside-out and pinned the edges together. Although the angle makes it look longer than it is, you can get an idea as to how long this shirt is for me. On normal people, this is known as a "dress". So, if you are of normal height, follow what I'm doing exactly to make a semi-circular-sleeved dress.

It's sheer, it's long, and I love it. Pair it with a belt or a belly chain and I'm set.

Did I mention yet that I'm all torso and this shirt is long?

Friday, June 1, 2012

Photo Friday: Milo the Explorer

Who doesn't love adorable animals? A few years ago, my husband and I took a road trip to Ohio for Thanksgiving, bringing our cats along with us. While they were less than thrilled about the trip (Well, Salem was less than thrilled. Milo was annoyed that his brother wouldn't shut up), they were both ecstatic to explore my in-law's home. This is back when we still lived in Boston (where "wildlife" didn't even entail the occasional bird in a tree), so Milo was beside himself with all the squirrels and chipmunks and sparrows...

I'll be heading back to Ohio next week for my sister-in-law's graduation from University of Cincinnati. No cats this time (they'll be happily at home, checked in on from time to time by one of our very kind friends), but plenty of hilarity to be had (which is the only way to describe what happens when my husband, my sister-in-law, my brother-in-law, and my father-in-law are in the same room together. Well, "utter chaos" can also describe it, but that sends a negative connotation.)
Related Posts Plugin for WordPress, Blogger...

09 10 11 12
Blogging tips