Monday, September 29, 2014

First Autumn as Homeowners Project

A long time ago, I got married. That fall, my husband and I collected leaves and I made a little something to commemorate our first autumn as husband and wife (even though it was technically our fifth autumn together).

Last year, we got our very first house.  That autumn, we didn't collect leaves so much as we raked leaves. But that didn't stop me from snagging a few leaves and repeating the process.

This project is super simple; all you need is a frame,  some high-quality paper, Mod Podge, and a paintbrush. And patience, because the leaves love moving on you. Click here for the original posting and a more detailed how-to on this project.

Thursday, September 4, 2014

Grilled Peaches

aka "Fun With Peaches, Pt 2"!

This are so delicious and so easy, it's not even funny.


You will need:
Peaches, halved and de-pitted
Canola oil

For optional topping:
1/2 stick of softened butter
1 teaspoon cinnamon
2 tablespoons brown sugar
pinch of salt


First, half and de-pit your peaches. Getting the pit out takes a lot of practice. I've found that the easiest way is to slice them in half, using the natural fold in peaches as my guide, twist the two pieces apart, and using your knife to gently pop out the pit. Sometimes cutting around the pit helps. And sometimes you'll get a nice clean de-pitting. Sometimes you won't.


Brush a healthy amount of canola oil on the flat side of the peach half and lay them on the grill. Close the lid and let them cook for 10-15 minutes.


If you'd like a super delicious (but totally unhealthy) topping, mix the butter, sugar, cinnamon, and salt. Scoop a spoonful on the grilled peaches while they're still hot and enjoy!


The bowl of peaches is slowly going down. Up next: peach jelly!

Wednesday, August 27, 2014

The Super Simple Peach Cobbler


So I have an absolutely adorable peach tree in our yard. Like everything gardening-related, it was planted by the previous owners. And -- judging from how little it is -- I'd say it was planted just before they left. This was the first year it produced fruit. For a little quasi-sapling, it really delivered:


So now I'm swimming in peaches. Only one thing to do: try out a million different peach recipes. First on the list? Peach cobbler!


You will need:
~6 cups of peaches, cut into wedges
3/4 cup of sugar or sugar substitute
1 tablespoon lemon juice
4 teaspoons cornstarch
1/2 teaspoon salt
For the topping: 6 tablespoons softened butter (better to leave the butter out to soften -- beware using the microwave to soften it!)
1/4 cup brown sugar
1 cup all-purpose flour
1/2 teaspoon salt


Preheat the oven to 365. In a big bowl, combine the peaches, sugar, lemon juice, cornstarch, and salt. Gently mix together until the peach wedges have an even coating. Transfer the mixture to a porcelain baking dish -- an 8" square dish or a round dish with a 8" diameter is best.


In another bowl, combine butter and brown sugar. Mix the two until the butter and brown sugar are fully combined and has the consistency of thick pancake batter. Gently mix in flour and salt. The mixture should start to crumble; if it doesn't break apart piece with your hands.


Sprinkle topping over the peaches and bake at 375 for 30 minutes. Place a loose cover on top of the dish and return it to the oven for an additional 20. Let it cool for 30-60 minutes and serve with a gigantic scoop of ice cream.


As fun as that project was, I still have a ton of peaches left. Good thing the internet is full of recipes for me to try and adapt from!

Thursday, August 7, 2014

A Crazy Little Update


I've been meaning to post an update on this particular blog for a while now. And "for a while", I mean for the last week. It's been a nutty time as of late, hence the supreme lack of posts. I just haven't had the time or the energy to be making any real crafts of late -- and those that I do, I haven't really been able to go that extra step forward and write tutorials for them. But that doesn't mean I've been sitting around, marathoning Hotwives of Orlando and doing nothing else (although, seriously, you should check out that show. It's hilarious):


1. For one, the 365 Blog Project is complete. Remember when I decided to attempt a post a day for an entire year? Three hundred, sixty-five posts later, it's complete. I cannot believe I actually got to see this project through to the end, but I'm happy I did. I really have to credit that project with helping me become a better essayist.


2. Speaking of, have you been keeping up on my essays? Primarily through Thought Catalog, but I've been known to get another website or two to pay attention. My latest essay is on the Market Basket situation, which has actually garnered enough attention that I was the 94.9 WHOM in New England yesterday to discuss Market Basket and my writing/modeling career in general.


3. I'm not finished blogging about non-crafting, non-cooking things. I've started a proper, all-encompassing blog by the same name as my Twitter. I usually frown upon blog hopping, because it's usually a sign that you like the idea of writing more than you like actually sitting down and making yourself write, but I wanted to keep my 365 blog nice and uniform. I'm currently doing a two-week fiction bootcamp (aka the 365 Nicorette Patch).


4. My life has been one big yogafest. I finish my formal training in about two weeks, and life has been insane since. I started teaching yoga to the homeless at a homeless services center, which has been incredible. It's definitely no walk in the park, but the reception has been a thousand times warmer than I thought it would ever be. I've also started subbing as a yoga instructor. I still have some more observation and practicum hours to get in before I'm fully "graduated", and I've been zipping all around New Hampshire as a result.


5. I promise I'll get back into the swing of things with this blog. There's a few projects that I just need to kick myself in the butt and write about. And -- as you could probably already tell -- I've been focusing on learning to actually cook. Hopefully now that training is winding down (and I won't be writing in a blog every single day soon), I can actually focus on this blog again!

Friday, July 25, 2014

Super Easy Garlic Parmesan Potatoes


This has been an instant classic at my house, and now I'm finally sharing it with you guys.


You will need:
2-4 Russet Potatoes (the exact number with depend on casserole size and your own preference
3 Tablespoons Olive Oil
1 Tablespoon Garlic Salt
2 Tablespoons Paprika
4 Tablespoons Parmesan
Salt & Pepper
Optional: Garlic Cloves


1. Preheat the oven to 425 and give your glass casserole dish a healthy spray of Pam or Crisco. Dice up the potatoes place them in said casserole dish.

2. Mix in the olive oil until the potatoes have a good coating about them. Mix in the remaining spices, adding or subtracting how much you want of each spice depending on your own taste preferences. If you'd like, you can also mince garlic or add whole garlic cloves to this meal.

3. Cook for 20 minute intervals. After each interval, take the dish out and flip the potatoes around. Continue this for an hour or until the potatoes are gold and crispy.

4. Take them out and sprinkle with additional Parmesan. For an added bonus, sprinkle in crumbled bacon.


The measurements of the spices really will depend on your temperament. I love spice, so I double up on the garlic salt and paprika. I also get down and dirty while making this dish, using my (recently and thoroughly washed) hands to mix in the spices and olive oil.


And remember to take the dish fully out of the oven before you mix the potatoes. I have a lovely burn scar on my left forearm that can tell you that it's a bad idea to mix while still in the oven, even if you have oven mitts on.

Wednesday, July 16, 2014

Writer's Wednesday: When The Idea of Your Novel Sickens You


I mentioned a long while back about the Travis Parker Effect. That's something I made up to bring to light a very common phenomenon with writers and artists alike: we work like a dog, pumping out our little creation to the exclusion of downright everything else, we finish the project, and there's a moment when we've decided it's the worst piece of shit imaginable and we should be ashamed for putting that much effort into it.


I call it the Travis Parker Effect because of 6 Days to Air: The Making of South Park. On Day 6, with the show conceptualized, written, recorded, and animated, Travis Parker slumps at his desk, muttering that the show is the worst show he has ever created. No one really seems to pay him any mind; you quickly get the vibe that this a common situation after a show has been created. The Travis Parker Effect is nothing more than the fallout artists sometimes get after they've dove headfirst into their project and have finally come up for air.


About a month ago, I finished Manuscript #3. It was a bit grueling at times, but somehow I plodded ahead and got the damn thing done. I finished it knowing that there were scenes I would have to add, scenes I would have to rewrite, characters that would have to be consolidated and characters that would need more fleshing out. That's the joy of a first draft: you got your main idea down, but now the real work begins.


I decided to follow the 3 month rule: you are not allowed to even look at your manuscript for three months. This helps you look at the manuscript with a fresh set of eyes, reading what is actually in front of you and not what you were trying to convey. But there's another reason: to avoid the Travis Parker Effect.


I'm already starting to feel it: man, I know this character just pops out of no where, and these characters are interchangeable, and this and that and this and that... which is hilarious, because, plot-wise, this is probably the best novel I have ever written. And let's not even get into the number of rewrites my first manuscript went through.


So, what do you do when the idea of your novel sickens you? When the very idea of editing makes you cringe because you're still feeling the emotional fallout of finishing your novel? You leave it the hell alone.


In fact, you leave all your manuscripts alone. I attempted to work on M#2 (which is still in it's first round of edits), only to find myself getting discouraged by the same attitude: this is the worst thing I've ever written, the number of edits and rewrites I will have to do is disgustingly high, what was I thinking, why did I let myself spend so much time on this...


This is why I have nothing but respect for full-time writers. I've been focusing my energy on the other endeavors in my life, like my yoga training (and preparing to teach yoga at a homeless shelter, but more on that later) and my tai chi classes. I've been focusing on writing out my proposal to martial art studios for a Yoga for Martial Artist class. I've been focusing on my 365 blog, which gets zero editing (I'm lucky if I read through the damn thing after it's done.)


The editing process is an onerous enough task on its own. The last thing you need is to attempt it while still processing the emotional fallout from what you created. So this little confession is my way of letting fellow writers know that it's okay to metaphorically slump at your desk and proclaim that you just made the worst thing ever -- just so long as the rest of you plays the part of the production team, paying no mind to the emotional fallout.


x-posted to my 365 Blog, which is less than 20 days away from completion!

Wednesday, July 9, 2014

Designing the Guest Bathroom


Everyone loves a little potty talk, no?


Since we don't have kids, the bathroom on the second floor of our house is essentially the guest bathroom. Aside from the hypothetical guest, it really only gets used if someone is hogging the master bathroom (and by "someone", I mean "my husband"). This means that, until this bathroom becomes littered with tubby-time toys and other kid items, I can indulge in a little home decor.


I remember going on Pinterest and obsessing over a DIY project that would give your bathroom mirror an accenting frame. Looks like I lucked out; all of the mirrors in our bathrooms are already framed. However, if you're thinking of doing the same this was one of the projects that I had pinned. It really turns a standard bathroom mirror into something more noticeable.


Is it slightly tongue-in-cheek to put pictures of riversides and fountains in a bathroom, but oh well. Why not have hung pictures in your bathroom?


And a long collage-like frame works great by door frames.


I got these adorable embroidered towels from my brother- and sister-in-law. The light tan goes so well with the white and pale lavender -- and it's a nice little reminder to the guest whose house they are in ;)


The light, airy feel of the room, it just made sense to buy a glass set for the sink.


And what is a guest bathroom without guest toiletries? I started this when we lived in our apartment and it now actually has a proper home. I collect the shampoos and soaps the same way other people will collect hotel matchbooks or business cards. Why not keep them in a glass out in the open? I know I feel a little weird using other people's big bottles of shampoo (or soap bars, sheesh). This gives them the option of having their own little bottle or bar.


And, going with the pale lavendar/glass theme, I got these for free thanks to my former neighbor at my apartment complex. Now they have a permanent home as bathroom decor (also, check out the snow in the background -- can you tell I shot these pictures a few months ago?).


I found this at Target and absolutely fell in love. The diamond folds are a really nice touch.


I know that's a lot of work for one little bathroom, but, hey, that's the joys of homeownership -- that bathroom is mine (technically the bank's until like 2033), and I can do whatever I want.


Up next -- my dining room! Now that we finally bought a kitchenette table and put our dining room table in the actual dining room, I've been able to let my pseudo-interior decorator loose on yet another room.

Thursday, July 3, 2014

Red, White, and Blue (and Green) Salad


I hope everyone has a wonderful Fourth of July, whatever the plans may be. If you're having a barbecue, may I suggest getting a little campy and making a red, white, and blue salad?


The ingredients are simple: Romaine lettuce and spinach, topped with cherry tomatoes, feta (or goat) cheese, and blueberries. It's quick, it's easy, and it's delicious.


I'm currently unwinding from my DC/NYC trip (pictures to come soon), but I'm excited for the fireworks, my friend's barbecue, and a weekend with not one, but two UFC events. Some call it an unhealthy obsession. I call it America at its finest =)

Tuesday, June 17, 2014

One of the Healthiest Breakfasts You Can Ever Have


I've noticed that, the older I get, the more I care about what I'm eating. I spend less and less money on prepackaged food and more money on, well, salads. I've recognized that my body isn't the crazy-food-eating machine that it used to be and have been making a more conscious effort about nutrition.


We've all heard the talk about cinnamon being a super-spice. It appears it can do everything from raise the dead to finish your manuscript. But I rarely have anything with cinnamon in it, and, when I do, the "cinnamon" is probably just "naturally flavored" sugar.


So I've started going down the old fashioned route. Did I say "route"? I meant oats. A couple mornings a week, I bust out my electric tea kettle and have some old fashioned oats with raisins, cinnamon, and agave sweetener. Gone are the days of instant packets backed to the brim with refined sugar (that I would sweeten even *further* with cream and brown sugar. Honestly, how was my mouth not a walking cavity machine when I was a kid?).


The key here is that you need all three ingredients with old fashioned oats: raisins and cinnamon and agave sweetener. Miss any of the three and the oats taste exactly like ... well, plain oats. But, together, they make a pretty awesome meal.


And it's as simple as pouring a bit of boiling water into a bowl of dry oats, raisins, and cinnamon, stirring the contents, and then adding in agave. I've also started adding a spoonful of chia seeds for a tiny kick (and extra hippy-dippy healthiness).


Of course, that's not to say I don't ever make stacks of pancakes and dive Scrooge McDuck-style into the syrup, but it's good to have a healthy option or two.

Friday, June 6, 2014

First House Key's DIY Project

Some businesses will frame the first dollar they made.  Some actresses will frame the title page of the script of their first professional acting job.  And some homeowners will frame their very first house key.


Now, I should point out that this project is hung up in an area very, very far away from any possible entrance.  The last thing you want to do is hang up the key in an area where someone might be able to get their hands on it.


So,  really, finding a place for the project that won't entice burglars is probably the hardest part about this project.  All you need is a frame, some pretty paper or cardstock, a key, and paint.  I decided to hand brush the key, but you can always use the hooked top of a coat hanger and dip the key in.


You can also use a page of a book for the background as well -- or the corner of a newspaper with the date you closed on the house. The possibilities really are endless.


It's hard to believe that, around this time last year, the original owners accepted our offer on what is now our humble abode.  We didn't officially close until the middle of July -- we had to do that whole "cross-country roadtrip" thing -- but the date is still worth noting.  A lot has changed since then, both in and out of the house, which only makes keepsake projects like this all the more important.

Monday, May 26, 2014

Sponge-Painted Letter Wreath


I hope everyone is having an amazing Memorial Day Weekend. This little project turned out to be a bit red, white, and blue -- just enough to motivate me to finally share it with you guys =)


All you need is a sponge, two colors of paint, ribbon, and a wooden letter. Paint the wooden letter -- front and back -- with a few coats of one color (a good rule of thumb is whatever color is lighter, but I can see the reverse working). I went with white for my base, and blue as my "sponge" color.


Squirt out a very tiny amount of paint of the second color onto a paper plate. And then, lightly -- oh, so lightly -- dab a sponge into the paint. You might want to press the sponge into a paper towel or a dry part of the plate to avoid any over-painting.


And then - dab away!


Loop a ribbon through your letter (or, if your letter is sans loop, staple or glue to the back) and you're done! It's a nice change of pace from the standard wreath.

Wednesday, May 21, 2014

Writer's Wednesday: Where the Hell Have You Been?


I don't know if I have been a great blogger or a shitty one.


On this blog, I've been terrible: I pride myself on doing at least one entry a week, maybe more, and I have been letting that fall by the wayside. I can't even blame it on not doing any more crafts: I have four finished projects just waiting to be written up, but the pictures stay on the camera and off this blog (two of those include upcycling various items into yoga bags. Hey, what can I say: you craft what inspires you and yoga is currently my main source of inspiration).


However, I've been making some great headway with my 365 Blog. I'm now less than 80 entries away from completing it. I can probably blame this project more than anything else; kind of hard to do a craft write-up when you're busy writing pseudo-essays every day! But I'm so happy I've kept up with it. It's been the driving force behind my essay writing: gone are the days when I think up an idea or craft an opinion and let it fall by the wayside. Since I have to write about something every single day, why not write about that? Those entries eventually become rough drafts, which become second and third drafts, which eventually get submitted to various websites.


Usually, these websites reject me. And sometimes, they don't. Primarily Thought Catalog, where I've been a fairly consistent contributor for almost a year now.


Every once in a while, another website picks up on my stuff: you can check out my essay on redefining a morning practice on Elephant Journal, my opinions on being "an un-noble yogi" here at Rebelle Society (although -- prima donna writer moment -- I have to mention that the editors had final say on the title and the formatting of the essay in general for both of these essays).


You can also check out an essay about strength over skinny on Literally Darling -- and keep an eye out for my Foolproof Guide to Planning a Wedding on that website next week.


And have you bought my book yet? It's now available across the board on all digital formats: got a Nook? You can get it on the B&N website? Kindle? Amazon, baby. iPad or iPhone? iBooks! Got a smartphone? Android market! And don't forget Kobo, if the aforementioned websites don't suit you.


So, yeah, things have been a bit busy! Combine this with my yoga teacher training and finishing up my third manuscript (which is actually coming together -- I'm only two chapters away from completing!) and it's not hard to see why this blog has slowed to a standstill.


But I promise to make a better effort with this blog -- but if this blog keeps silent, at least you know I'm not dead ;)

Friday, May 16, 2014

How to Get Rid of a Wasp in the House

...without spraying the inside of your house with Raid.


There is a wasp nest somewhere on our property, and it's resulting in wasps getting into the house. I've probably had to kill four or five wasps within the last two weeks. As much as I love spraying Raid and Wasp Killer outside, I can't exactly be running around the house spraying it, especially with a bunch of small mammals living in the house (let's not forget that Raid is a neurotoxin).


So what do I do? I use hairspray and thick-soled shoes.


From as far of a distance as I can get, I spray a generous amount of hairspray on the wasp. This causes their wings to become sticky and heavy, forcing them to eventually fall to the ground and attempt to clean the hairspray off. When they fall to the ground -- while wearing my shoes -- I stomp on them with everything I've got. The extra force is necessary; wasps seem impervious to the traditional methods of insect-killing (fly swatters et al) and -- trust me on this one -- you don't want to just *injure* a wasp. Wasps are incredibly aggressive and have zero issues stinging you to prove a point.


And remember: the hairspray alone will not kill them. It might take them a while, but they can and will clean the hairspray off and be perfectly fine.


For someone like me, who uses so little hair spray that she still owns hair spray from her days going to high school dances, this is perfect. Actually, what would be perfect is to not have any wasps near or in my house, but we can't have everything.

Thursday, May 1, 2014

Cleanliness Tip: Martha Stewart Can Shove It


Source: Hyperbole & A Half


Keeping any abode clean is a full-time job in and of itself. The bigger that abode gets, the more of a job it becomes. Martha Stewart suggests instituting a "tidy room" clause: whatever room you enter, you are not allowed to leave until everything is put away. Basically, if you enter a room in your house that is all sorts of disorganized and messy, good luck making new plans anytime soon. She even suggests giving clean rooms a once over to make sure everything is in its rightful place.


And to that I say: sure, just as soon as a adopt a brand new personality.


I'd love to be that type of person who never lets anything accumulate for long (especially if it's a room I go in). It would be great if I had the mental fortitude to make sure every room I enter is clean before I leave it. But I'm not. And if I tried to implement that rule, I know I'd burn out (and my husband would follow it exactly once). I'd last a whopping week or so before I become like the Hyperbole and a Half girl, meekly asking if she really has to clean all the things.


So I have a new rule in place: the "one item" rule. This is especially true for rooms that seem to get way too cluttered for their own good (like my dining room table). Essentially, before I leave a room, I make sure at least one thing is put away. Usually that thing is whatever I was using at the time. Sometimes it's not. And sometimes that one bit of tidying is enough to get me to tidy up a lot more than just one item (apparently even housework isn't spared from the laws of physics. An object in motion stays in motion...).


This really works for someone as scatterbrained like me, who will enter a room and forget why she went in there. I might not remember why I went into the bedroom, but that pair of jeans is now in the hamper, so the trip wasn't completely for naught.


I might not have all my baseboards scrubbed and shelves dusted by 9 a.m., but I am keeping my head above water when it comes to keeping the house nice in the midst of school and work (and my delusions of making it as a writer). And that's really all anyone can ask for.

Tuesday, April 22, 2014

Try it Tuesday: Sugar & Oil Lip Scrub


I don't know if it's because I have big lips or just a tendency to have dry skin, but chapped lips are a huge issue with me. It doesn't matter how much chapstick I wear: within the hour, I have flakey skin.


A makeup artist I worked with recently gave me this little trick, and I'm honestly in love. It's as simple as equal parts oil olive and sugar. I keep the mixture in a small snap-lock container and stored in the fridge.


The sugar exfoliates; the oil moisturizes. The only hard part is wiping off the lip treatment (instead of just licking it off -- oil and sugar has no right to be as delicious as it is!)

Friday, April 18, 2014

Photo Friday: The Lowell Esplanade

Now that we're finally thawing out, I figure I should dust off a second folder of old pictures. These are from October, when I decided to hang out on the Lowell Esplanade.


Saturday, April 12, 2014

Olive Garden at Home: Homemade Zuppa Toscana & Garlic Bread


The Olive Garden has a special place in my heart, the heart of my husband, and the heart of my in-laws. Going to the Olive Garden means tomfoolery and cheese chicken and enough laughs to last a year. The food itself is a huge guilty pleasure of mine: yes, it's about as authentically Italian as Taco Bell is authentically Mexican, but damn is it good (sidenote: I also love Taco Bell). But unfortunately, Olive Garden, much like Taco Bell, isn't exactly good for you. Like, not by a longshot is it even remotely good for you. Thankfully, I found a few zuppa toscana recipes and, after a little bit of tweaking on my end (read: tweaking, not twerking), I'm in love:


FOR THE SOUP You will need:
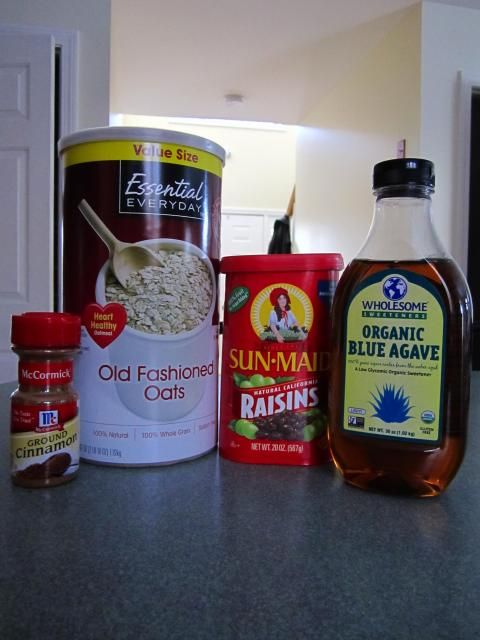
16 ounces chicken broth
1 1/3 cups water
1 pound sausage (I'm partial to Jimmy Dean's Hot Breakfast Sausage, but, really, go with your preference)
3-5 medium-sized russet potatoes
1/4 cup bacon bits
5 garlic cloves, minced
2-3 cups kale, chopped
1 cup heavy whipping cream
Salt and pepper as needed


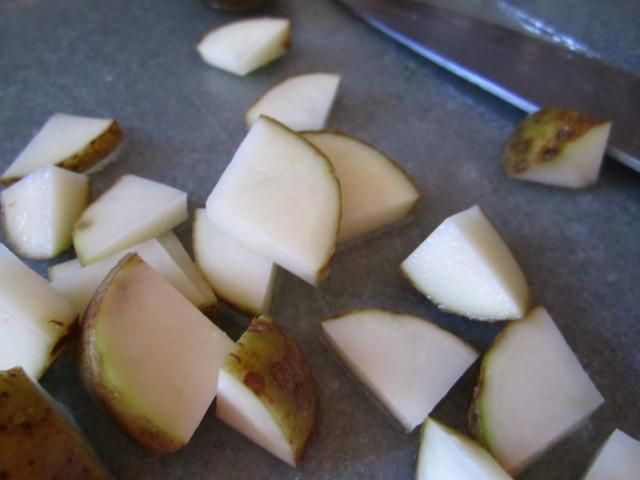
Fully cook the sausage. While it's sizzling in its pan, cut the potatoes into quarter slices. You want to keep these slices fairly thin. The easiest way to get these shapes is to make two perpendicular cuts lengthwise down the potato before slicing it up.


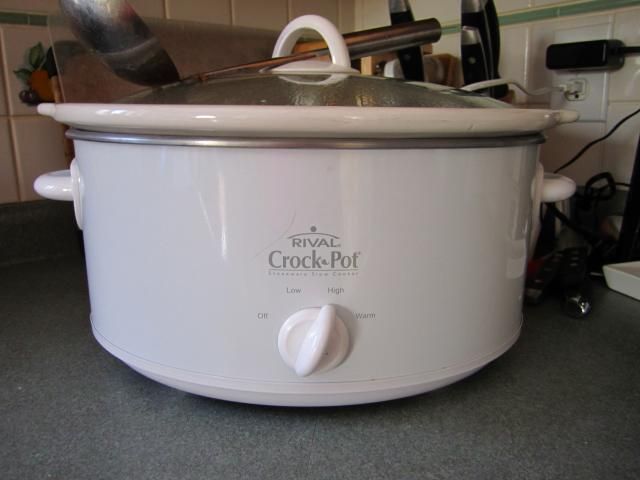
In the crockpot, mix in: chicken broth, water, sausage, potatoes, bacon bits, and garlic. Set the crockpot to "high" for 4 hours (or "low" for 8 if you want to prepare this before you leave for the day).


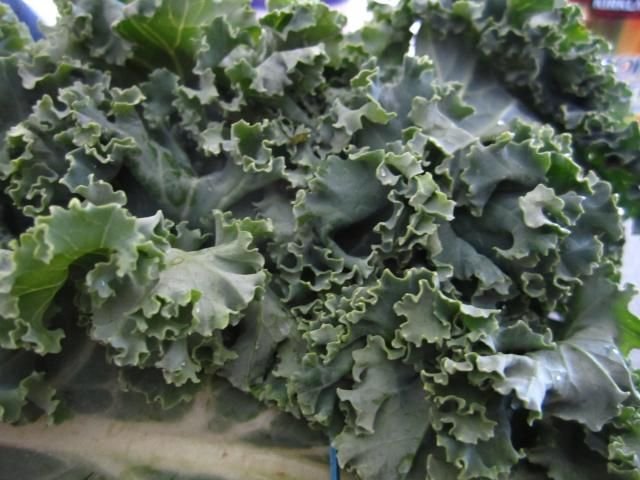
After four hours, add the kale and return the lid for 5-8 minutes. If you prefer a slight crunch to your kale (or if you are using a less-crunchy green), set the slow cooker to low when adding the kale. Mix in the whipping cream and enjoy! Sprinkle a little Parmesan cheese for that extra kick.


--


FOR THE BREAD You will need:
1 Package of Focaccia Breadsticks (Or, if you're so up to it, make it yourself. But don't look to me for that recipe! My Betty Crocker abilities only go so far)
Butter
Powdered Garlic
Salt


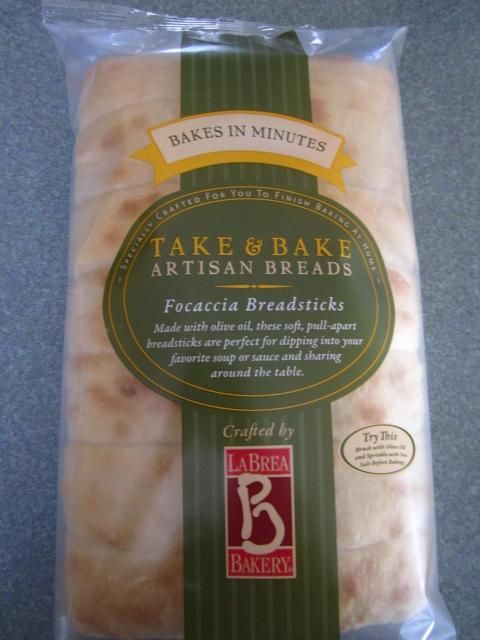
This bread is incredible. It's nothing too special: you should be able to find it at the bakery section of any grocery store. Ten minutes in the oven and you have delicious break-apart bread.


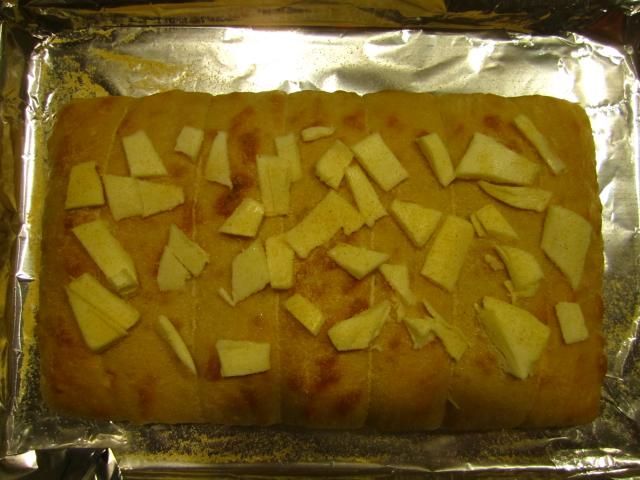
This is so simple, it almost hurts: slice lots of thin butter pieces, cut said slices up, place it on the bread, and sprinkle as much (or as little) garlic and salt as you'd like. My husband and I have an unhealthy (literally unhealthy; be still my arteries...) obsession with garlic butter, so our bread got a nice dusting of garlic and salt. Place them in the oven for however long the bread package requires.


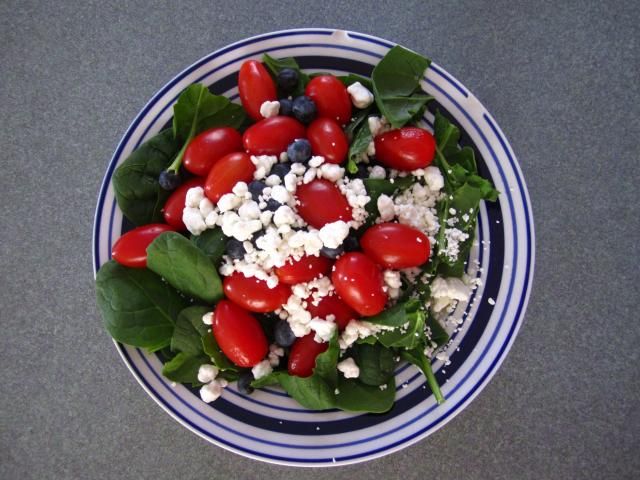
Add in a simple house salad and you've got your Soup, Salad, & Breadsticks meal right here. And you don't have to risk running into us smacking each other over the head with breadsticks and refusing to say, "when," when they grate Parmesan cheese on our meal.
Related Posts Plugin for WordPress, Blogger...

09 10 11 12
Blogging tips