Wednesday, January 29, 2014

Trial & Error Yoga


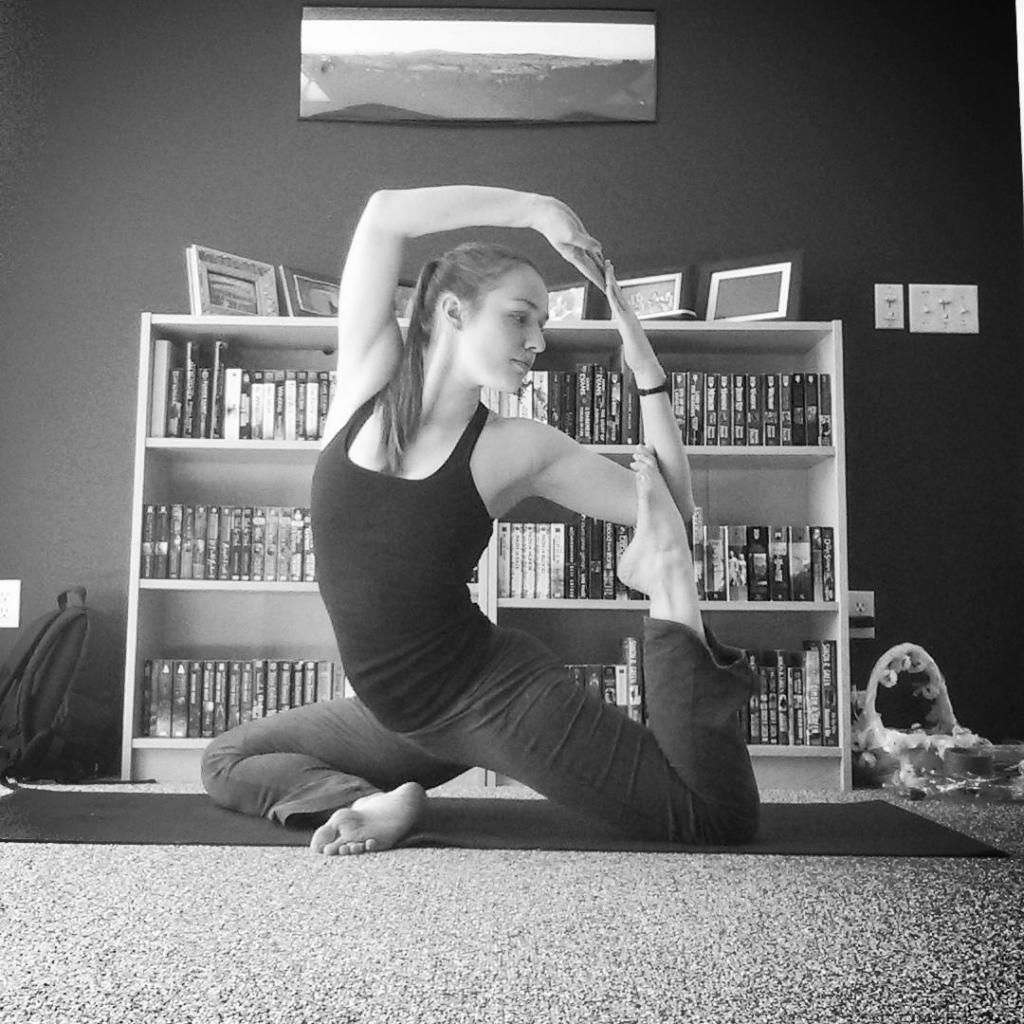
(Here we go: I promised some fitness posts in 2014!)


It's easy to look at someone who does, on average, 30-60 minutes of yoga every single day, someone who cannot shut up about yoga, someone who is enrolled in yoga teacher training, and assume that they have always been an obsessed little yogi all their lives. Or, that they have always been a fitness buff and took yoga on as yet another conquest. The truth of the matter is, not even four years ago, I was the type of person who thought going to the gym three times a week for thirty minutes was "hardcore training." Been on the elliptical for 20 minutes? Hoo-wee, someone get that girl a pizza because she is burning ALL the calories.


To be perfectly honest, I was sporadic and inconsistent with exercise and I was as inflexible as all getout. I started getting into yoga because I needed better ways to handle the stress at work (and I was ashamed that I couldn't even touch my toes). I looked at what was available in terms of classes and got overwhelmed: I'm not even inside a gym for an hour and fifteen minutes -- how was I supposed to do yoga for that long?


I started off slow. I had a (very crappy) yoga app on my phone that I used for the first month -- before recognizing said crappiness and moving on. This is when I found the power of YouTube. From here, I found comprehensive yoga classes that got me moving, got me stretching, and, most importantly, got me into the right mindset. When I was ready (and only when I was ready), I started finding longer and longer videos, until eventually I caved and started taking full-on classes.


Below are the very videos that got me into yoga. Yoga can be pretty daunting, especially if the teacher is prattling on about pranayama and ujjayi breath and you are just praying you don't fart while in warrior one pose. These videos made yoga super accessible, and I can't recommend them enough. While any video is wonderful for a beginner, I do recommend doing these videos one at a time, and in this particular order:


Tara Stiles - De-Stress Yoga
Who doesn't have nine minutes? What I love about Tara Stiles as a yoga instructor in general is that she has such a chill demeanor that just listening to her makes you feel calm. I'm a bit of a hipster; I prefer Tara's *original videos*, before she got all internet famous (this being one of those pre-fame videos), but all of her routines are super fun and interesting. Can we guess why someone like me -- a then-frazzled preschool teacher -- would gravitate toward this routine after a long day?


Tara Stiles - Morning Yoga For Flexibility
Honestly, Tara Stiles is so absurdly approachable when it comes to her routines. It is little wonder that her videos make up the beginnings of this list. These little 10-to-15-minute routines are the ultimate introduction to yoga. Don't let her flexibility make the sequence feeling daunting. You can always modify (heaven knows my hands were not touching the ground when I first did these videos):


Tara Stiles - Yoga for Getting Out of Your Own Way
This one is a little longer (11 minutes) and a little more challenging. But, as Tara Stiles says, you don't have to do all the crazy postures. Just get on the next bus. This little routine really improves your core strength, your flexibility, and your balance.


Yoga Today - Yoga for Stress Relief
It's a pity that the shorter sequences from Yoga Today are becoming harder to find on YouTube. Yoga Today is a great website, however, for full-length classes. Adi Amar has such a sweet demeanor and it really shows when she explains her sequences. She is easily my favorite Yoga Today instructor. This 13-minute sequence is a guaranteed relaxation-creator:


Urban Mystic Yoga Flow
This is my go-to "I don't feel like doing yoga today" YouTube routine. There is something about this 20-minute routine that eases me into yoga/exercise. I don't know if it's the fun dynamic between the two yoga instructors, or the reasonably-paced sequence (or the catchy music), but this video really is my safety net when all I want to do is sit around.


Yoga Quickie - 20 Minutes of Flow
Once you get comfortable with 10 minutes of yoga, the jump to 20 really isn't that scary. This is a very powerful 20-minute sequence, and you'll feel it in your core and your shoulders. But there is something so relaxing about the instructor's voice, as well as the waves crashing on shore.


Intermedia Dogmar Vinyasa Flow
Are you ready to kick it up? The 40-minute classes from this particular instructor were my litmus test -- if I could have the mental fortitude to do a 40-minute class (because my biggest worry was not my muscles fatiguing, but my brain wandering), then maybe I was ready for those 1:15 classes. This video -- along with similar videos from this instructor -- eased my worries about if I was "ready". This sequence is challenging, but it feels incredible and the 40 minutes are over before you know it:


Yoga shouldn't just be for people who can do splits and backbends and can balance their entire body weight on one elbow. And it also shouldn't be reserved for those who know the difference because a yama and a niyama. Yoga is a great physical and mental practice with so many variations that there will be a right fit for everyone (I should point out that all of these videos can be classified as vinyasa-style. There are countless different types of yoga, from gentle restorative yoga, yin yoga, ashtanga yoga, power yoga...). It's just a matter of giving it a try and seeing what works for you.


(FYI: "yamas" are essentially ethical practices that you do for other people, while "niyamas" are ethical practices that you do for yourself.)

Friday, January 24, 2014

Photo Friday: Salem and the Chandelier

Our dining room isn't much right now. Someday, there'll be an actual dining room set and china cabinet, but, until then, a card table with a tablecloth over it will have to do. Our cats use the room more than anyone else. From darting around and under the table to playing with the chandelier, this is definitely their room.


Wednesday, January 22, 2014

Super Simple Winter Yarn Wreath


Christmas might be over, but winter is still here. And, from the looks of it, it will be here for a long time. While the Christmas tree is gone and the decorations have long been taken down, I can still enjoy some aspects of the festivities.


All you need for this is a styrofoam circle, pins, yarn, and a bow. I took full advantage of the winter clearance items and grabbed this bow for maybe 75 cents including the sale.


It's as simple (and as tedious) as pinning one end of the yarn onto the back of the styrofoam and wrapping the yarn around the wreath. This is the perfect product to do while watching TV. Lots and lots of TV. I would systematically push a pin into the most recent strand of yarn, just to keep everything in place (and prevent a catastrophic unraveling).


I love ombre yarn. They make the coolest scarfs and, when you wrap it around a styrofoam tube, it gives an awesome multi-tonal accent. I simply stopped wrapping the white yarn at roughly the 5/6th mark, pushed a pin through the end of the white yarn, and started the process all over again with with blue yarn. You can read all about pins and styrofoam wreaths on my other wreath post.


The bow came with two wire strands, which made fastening it to the wreath super easy. I put a few pins into the wire strands (or, technically speaking, I pushed the pins through the fabric weaving around the wire strands) to keep everything in place.


While no one is naïve enough to say that January can be considered a Winter Wonderland (Whiner Wonderland, definitely; we're all sick of the cold by now), it is still nice to have something to make the rest of the season bright.

Friday, January 17, 2014

Photo Friday: Hammogsett Beach

I don't know about you, but I'm getting bloody sick of road trip pictures. So I think I might shelve the remaining pictures for now (especially since we focused more on traveling back home on our return leg, so the ratio between on the road pictures and pictures of NOT on the road is very skewed) and post some pictures that have been on the back burner.


Last October, I drove 3.5 hours down to Hammogsett Beach, Connecticut, to do a photoshoot for SportRack. And while I ended up driving in one day what most people drive in an entire week, I loved getting that "last hurrah" at the beach. It helped that the weather was unseasonably warm and it really felt like the summer day we were trying to portray in the print ad.


Wednesday, January 15, 2014

DIY T-Shirt Quilt


I'm a sentimental person (if that isn't obvious enough yet). I hold onto everything, to the point that it could be considered hoarding. I've learned to channel it into scrapbook/upcycling these items, lest I start renting out storage space to keep everything.


I have an entire bureau at my parents' home filled with clothes that I can't bear to give away. This includes favorite shirts from middle school, outfits that I wore during important times in my life, and purely items that I've had since forever and therefore cannot part with.


During one of my trips home, I filled up two garbage bags with said clothing and brought them home, determined to make them useful. Some of these items turned into tank tops. The ones that held the most sentimental value were turned into a quilt. (Bear with me; this was done when we still lived in our apartment and the lighting/overall decorum of the place is not the most blog-picture-friendly).


This is an absurdly simple quilt. You need no quilting experience necessary (which is good, since I had none). All you need is some t-shirts and a blanket. And a rotary cutter. And an iron. And sewing equipment.


First cut 12 x 12 squares out of your shirts. I used a piece of scrapbooking paper for reference, tracing around it with a damp piece of chalk before cutting.


Once everything was cut out, I arranged the fabric on the floor until I got the pattern I desired. My backing blanket is a standard felt throw blanket that you can get at places like Five Below and TJ Maxx for dirt cheap. A 5 x 5 pattern of t-shirt squares will do nicely, although I had to make things difficult and create a semi-intricate center portion.


To sew the pieces together, simply place two of the squares together, with the "right" sides facing together (think of a closed book. You want to open said "book" and see the good stuff inside. PITS (Pin it to sh_t) and sew accordingly. It doesn't matter what your seam allowance/how far from the edge you sew, so long as that measurement stays consistent. Iron the seam down when finished.


Return the two pieces to their spot and add on another square. The process stays the same: place the new square right down side onto the newly-emerging quilt. Pin along the edge and sew.


I cannot stress enough the importance of ironing the seams down when you finish a stitch. This will create a straight, crisp line between pieces.


Do this process horizontally until you reach the end. Then, like a typewriter (dear God, please remember typewriters), begin again on the next row. Work your way across, and repeat the process. Sewing the rows together is a lot like sewing the squares together, only now you place an entire row on top of the row below it, the "right" sides facing down. Again, imagine a book. Down be afraid to "open" the book after pinning everything in place to make sure things are looking the way they should look.


Once everything is sewn in place, lay out your blanket and place the front part of your quilt face down on the blanket. Being careful not to stretch the blanket fabric, pin everything into place -- leaving about 6" of unpinned space in the center part of one of the edges.


Sew around the blanket, starting at one edge of the 6" gap and ending at the other. Use that gap to turn the blanket right-side-out. You'll have to hand-sew the gap, as no machine as really mastered this next part.


Thread your needle through the underbelly of one side, loop it over to the other, and thread it through the other side's underbelly. You'll be creating figure 8s between the two pieces of fabric. Continue this process until you reach the end of the quilt and tie a small knot.


Flatten the quilt and iron out the edges. Starting in one corner and working your way out, pin everything into place with safety pins. Again, avoid stretching blanket fabric, as felt/plush tends to have more give in it than poly/cotton blends.


Using that needle and thread (or a darning needle and yarn; both can work in this situation), create little ties in every corner where all four squares meet. This is as simple as threading the needle down and back up, roughly 1/4 of a centimeter from the original spot, and tying a knot. This doesn't need to be too fancy; it's simple there to keep everything in place.


And víola. It took a little finagling to get my Monty Python centerpiece to work, but the work was worth it. Now my t-shirts that were just collecting dust are going to good use.


The best part is that the blanket is super soft, so I'm comforted not only by the memories tied by the shirt, but by the wonderful fabric of the blanket.

Friday, January 10, 2014

Photo Friday: The Petrified Forest and Sierra Nevada

It might be two hours until Saturday, but it's still Friday for now, therefore it still counts!


We're winding down our little trip down photography lane with my roadtrip (only, y'know, seven months later). After San Francisco, my husband and I drove up north a little bit to the Petrified Forest before winding down through Napa Valley and back through the Sierra Nevada. Since neither my husband or myself really drink (I'm a hard cider/champagne girl and nothing much else, and my husband doesn't drink at all), we didn't really stop in Napa, but we did make sure to stop again in the Sierra Nevada to enjoy the mountains one last time.


Monday, January 6, 2014

Important Heat-Saving Things Everyone Should Do


I remember when my husband and I first filled up our house's oil tank. It was brutally expensive, but, as we saw it, the cost was a lot easier to swallow if we broke it down month-to-month. Yeah, you could fly across the country with the money spent on oil, but it wasn't too bad if we only had to fill it up once a year.


Cut to two months later: we're down to 1/8th of a tank.


There are some obvious heat-saving things to do: turn down the temperature on the thermostat, set up a timer so that the house is cooler when everyone is at work, etc. But, even with these measures, we were still burning through our oil at an alarming rate. And some rooms were just cold. Like, "sweater and fuzzy socks and a blanket and you're still shivering" cold. We knew we couldn't live like this, so we trekked out to the Home Depot one more time and went about fixing our house's heating problem.


Heat-Saver #1: Insulate your pipes. The pipes leading out of both the heater and the hot water container were brutally hot to the touch. This meant that heat was escaping out into our unfinished (and unheated) basement. Some of these pipes were right next to the cold water pipes. The amount of heat lost just in the journey from the heater to the baseboards was so intense that the heater pipes that lead to the den were actually cold to the touch (and - lo and behold - the den ended up being one of the coldest rooms in the house). We were shocked at the amount of pipes we had to insulate, and we were equally shocked at the amount of heat we were probably losing from these yards and yards of uninsulated piping.


Heat-Saver #2: Caulk your windows. Even when our heat was turned up, we were shocked by the "cold spots" in the house. After a fun game I'd like to call "Follow the Cold", we realized that cold air was essentially getting pumped into our rooms around the edges of the window sill. These cracks were almost invisible, but enough that we could actually feel the cold air moving past our hands.

Caulking is a tedious process, but a necessary one. These cracks are going to happen as a house settles into its foundation and expands/contracts with the weather. Just from doing the first two heat-saving actions, the den went from a second fridge to a pretty habitable room.


Heat-Saver #3: Close your doors. As much as I love my guest room (especially with the "new to the room" painted shelves, which is for a later time), it was easily the coldest room on the second floor. Even after caulking the windows, the room gets very little direct sunlight. And since the room is barely used by anyone except for the cats (and the occasional guest), it made no sense to heat up that room. The heaters are still on in that room, but, with the door closed, the heat for the rest of the house has fewer places to travel.

This also includes basement doors. Heat rises, so the basement will naturally be the coldest spot in the house. So remember to keep the door closed behind you when you enter and exit the basement.


Heat-Saver #4: Shrink-film your windows. You know that thing your grandparents do to with all their windows? It can look incredibly tacky, but it's a huge heat-saver. Since I still can't stop the "tacky thing grandparents do" mindset, we only used the shrink-film on windows that had shades that we could draw over said shrink-film. We also put the shrink-wrap on the metal parts of the window instead of the inside window frame, which makes it more inconspicuous (and saves the paint on the window frame. After my painting fiasco, I trust no adhesive!)


Heat-Saver #5: Be aware of passive solar heat. This simply means be aware of when the sun shines directly into your house. For example, the sun shines directly through the big window in my foyer, which warms up the stairwell and the second floor hallway. If you are typically at home during the day, being away of when the sun shines directly and when the sun doesn't can play a huge role in how warm your house gets. Opening the blinds when the sun shines in and closing them when they stop (and, to go back, shades/curtains/blinds can work as insulators as well if you really, really, really don't want to shrink-film your windows) can make a big impact.


Heat-Saver #6: Turn down the tempering valve on your hot water. If you're like me, you tend to turn the hot water on all the way, use said hot water until it hurts to use it, then turn it down to a better temperature. It makes no sense to use such brutally hot water just to wash a dish. Turning down the tempering valve so that the "max heat for hot water" is just slightly above comfortable (instead of "flesh-searing") means fewer instances when the water is needlessly heated up.


Heat-Saver #7: Finish your basement. The concept of an unfinished basement was foreign to me growing up, if only because everyone I knew had a finished basement (and, living in the south shore of Boston, where every house is a tiny cape, you need those extra rooms for standard living space). My husband and I desperately want to finish our basement someday, but that's a few thousand dollars we really don't have right now. However, we rest assured that finishing the basement won't just be for personal satisfaction: the extra insulation in the basement will really help keep the cold out. A cold basement can mean colder everything else -- especially if you don't close the basement door behind you (hey, remember that helpful hint?). The return on investment in terms of saving heat is pretty minimal, but it's something to keep in mind when trying to budget out potentially finishing your basement.


All I know is that I'm thankful that we're already well into January. It means (hopefully) only two or so more months before the temperatures get a little more hospitable.
Related Posts Plugin for WordPress, Blogger...

09 10 11 12
Blogging tips